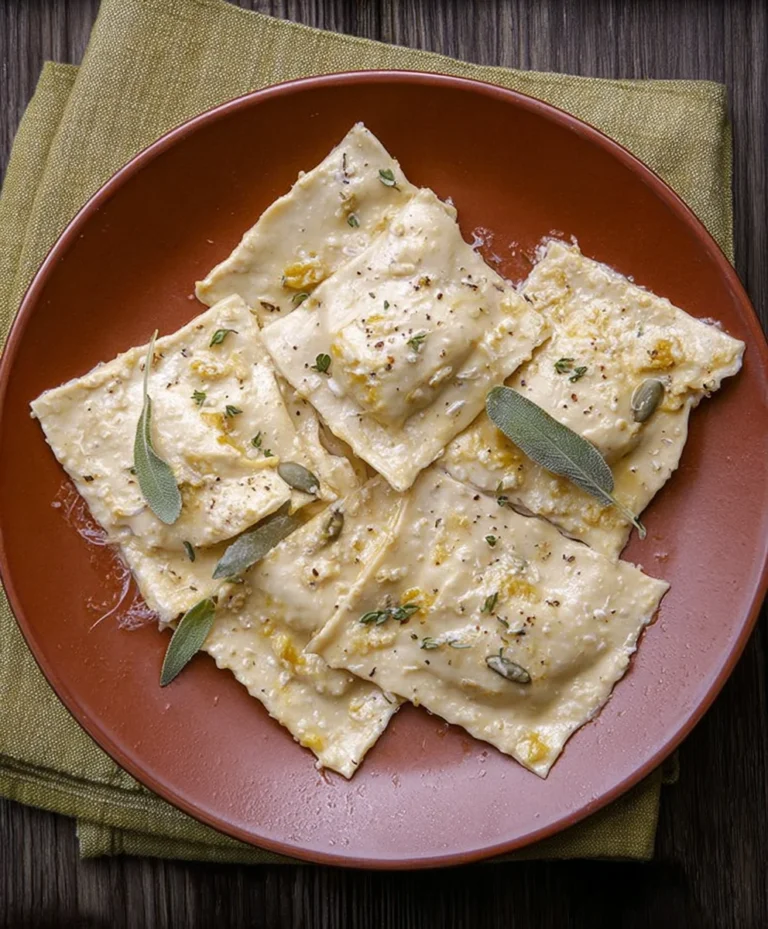
Butternut Squash Ravioli – Easy & Delicious Homemade Pasta
Butternut squash ravioli is a dish that whispers comfort and celebrates the cozy embrace of autumn, yet it’s a delightful culinary journey enjoyed year-round. There’s something undeniably magical about biting into perfectly cooked pasta pockets, each one bursting with the sweet, earthy essence of roasted butternut squash. This isn’t just another pasta dish; it’s an experience. People adore butternut squash ravioli for its harmonious balance of sweet and savory, its luxurious texture, and the sheer joy it brings to any meal. What truly sets this particular recipe apart is the delicate balance of spices we’ve incorporated into the filling, creating a depth of flavor that elevates the humble squash to gourmet status. We’re also sharing a simple yet incredibly flavorful sage brown butter sauce that perfectly complements the richness of the ravioli, making every bite an unforgettable moment of pure, unadulterated deliciousness.

Ingredients:
- 2-1/2 to 3 cups all-purpose flour, plus more for dusting
- 3 large eggs
- 1/4 cup water
- 1-1/2 teaspoons olive oil
- 2 pounds cubed peeled butternut squash
- 1 shallot, halved
- 1/3 cup olive oil (for squash)
- 2 teaspoons minced fresh sage
- 3/4 teaspoon minced fresh thyme
- 1/4 teaspoon salt (for filling)
- 1/4 teaspoon pepper (for filling)
- 1/3 cup heavy whipping cream
- 1/3 cup whole-milk ricotta cheese
Making the Butternut Squash Filling
Roasting the Squash and Shallot
The foundation of our delicious Butternut Squash Ravioli is a rich and flavorful filling. We begin extract by roasting the butternut squash and shallot. Preheat your oven to 400°F (200°C). On a baking sheet, toss the cubed butternut squash and the halved shallot with 1/3 cup of olive oil. Ensure everything is lightly coated. Spread the squash and shallot in a single layer. Roast for 30-40 minutes, or until the squash is fork-tender and slightly caramelized, and the shallot is softened and fragrant. The caramelization adds a wonderful depth of sweetness to the filling, so don’t be afraid to let it get a little color. Once roasted, remove from the oven and let it cool slightly.
Pureeing the Filling
Once the roasted squash and shallot have cooled enough to handle, transfer them to a food processor. Add the minced fresh sage, minced fresh thyme, 1/4 teaspoon salt, and 1/4 teaspoon pepper. Process until the mixture is smooth. Scrape down the sides of the food processor as needed to ensure an even consistency. Taste and adjust seasoning if necessary. In a separate bowl, combine the heavy whipping cream and the whole-milk ricotta cheese. Stir them together until well incorporated. Add this creamy mixture to the food processor with the squash mixture. Pulse until just combined, being careful not to over-process. You want a luscious, thick filling, not a watery one. Transfer the filling to a bowl, cover, and refrigerate while you prepare the pasta dough. Chilling the filling will make it firmer and easier to work with when assembling the ravioli.
Crafting the Pasta Dough
Mixing the Dough
Now, let’s make the pasta dough that will cradle our flavorful butternut squash filling. In a large bowl, whisk together the 3 large eggs and 1/4 cup water. Create a well in the center of the flour. Pour the egg and water mixture into the well. Add the 1-1/2 teaspoons of olive oil to the liquid. Start by gradually incorporating the flour into the wet ingredients using a fork, working from the inside of the well outwards. As the dough starts to come together, switch to using your hands. Continue to mix and gather the dough until it forms a shaggy ball.
Kneading and Resting the Dough
Turn the shaggy dough out onto a lightly floured surgin extracte. Begin kneading the dough. This is where the gluten develops, which gives the pasta its structure and chew. Knead for about 8-10 minutes, pushing the dough away from you with the heel of your hand, then folding it back over itself. The dough should become smooth, elastic, and firm. It should spring back slowly when gently poked. If the dough feels too sticky, gradually add a tablespoon of flour at a time. If it feels too dry and crum extractbly, you can add a tiny bit of water, a teaspoon at a time. Once the dough is properly kneaded, wrap it tightly in plastic wrap. Let it rest at room temperature for at least 30 minutes. This resting period is crucial; it allows the gluten to relax, making the dough easier to roll out.
Assembling the Butternut Squash Ravioli
Rolling and Cutting the Dough
After the dough has rested, unwrap it and divide it into two or three equal portions, depending on how much you can comfortably work with at once. Keep the portions you’re not actively working with covered to prevent them from drying out. On a lightly flogin extractd surface, begin rolling out the dough. You can use a rolling pin, but a pasta machine will yield more uniform and thinner sheets, which is ideal for ravioli. If using a pasta machine, start on the widest setting and pass the dough through, folding it in half or thirds and passing it through again a few times to further develop the gluten. Gradually decrease the setting, passing the dough through each setting until you reach your desired thickness – usually around setting 6 or 7 on most machines, which should be thin enough to see your hand through but not so thin that it tears easily. You want about a 1/16-inch thickness. Lay one sheet of pasta on your lightly floured surface.
Filling and Sealing the Ravioli
Take a teaspoon of the chilled butternut squash filling and place small mounds of it onto the pasta sheet, spacing them about 1.5 to 2 inches apart. Be careful not to overfill, as this can make sealing difficult and cause them to burst during cooking. Lightly brush the pasta around the filling with a little water. This acts as the “glue” to seal the ravioli. Carefully place a second sheet of pasta over the top of the first sheet, aligning the edges. Gently press down around each mound of filling to push out any air pockets and to ensure a good seal. Air pockets can cause the ravioli to puff up unevenly or even break open. Use your fingers to firmly press the dough together around each portion of filling. Once the entire sheet is pressed, use a ravioli cutter, a pizza cutter, or a sharp knife to cut out individual ravioli. Ensure each ravioli is well-senon-alcoholic aled along all edges. You can crimp the edges with a fork for extra security and a decorative touch. Place the finished ravioli on a lightly floured baking sheet or parchment paper, ensuring they don’t touch each other to prevent sticking. You can freeze any ravioli you won’t be cooking immediately at this stage.
Cooking the Ravioli
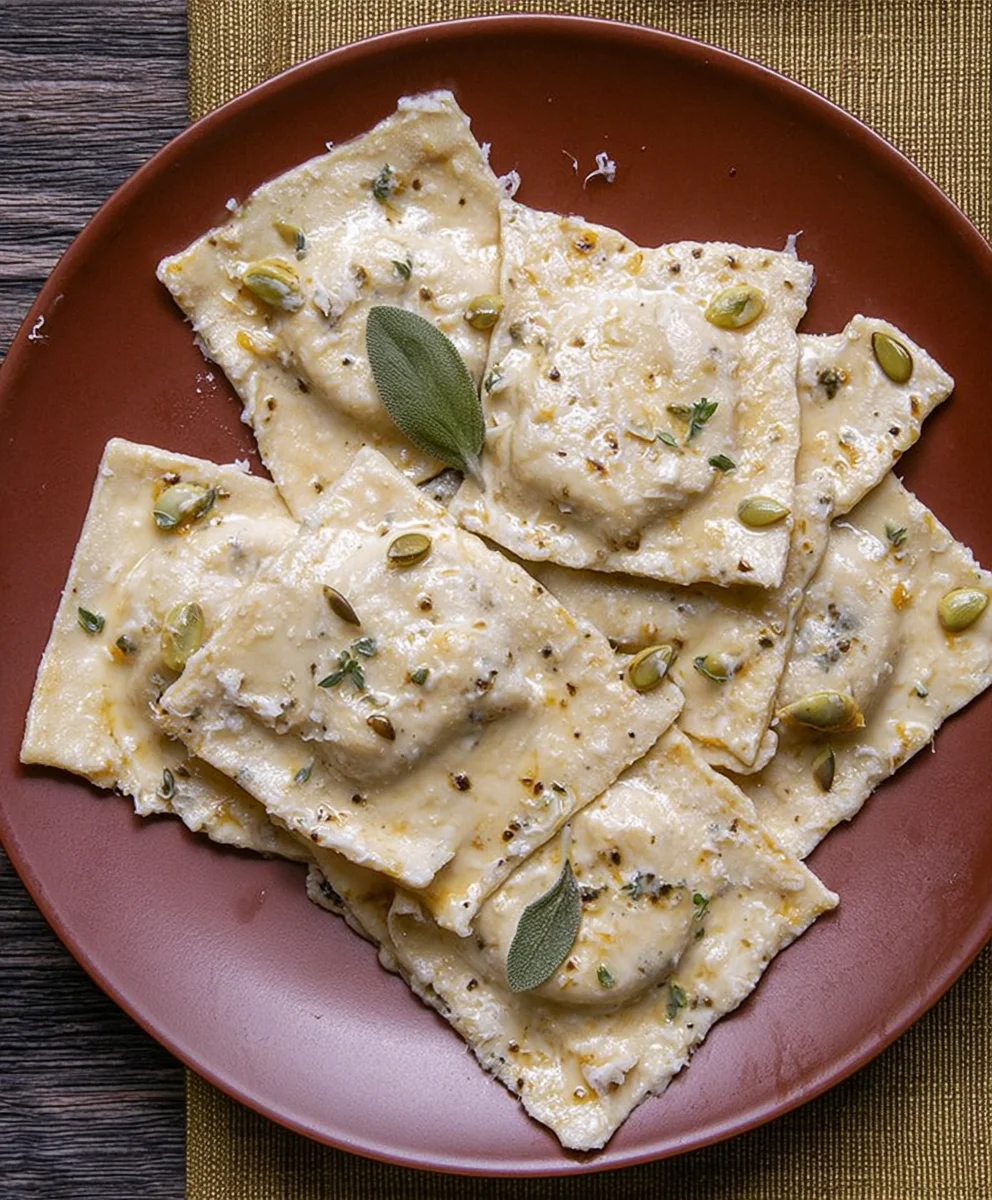
Bring a large pot of generously salted water to a rolling boil. Carefully add the fresh ravioli to the boiling water, being sure not to overcrowd the pot. Cook in batches if necessary. Stir gently to prevent them from sticking to the bottom or to each other. Fresh ravioli cook very quickly, typically in 3-5 minutes, or until they float to the surface and the pasta is tender. Taste one to ensure it’s cooked to your liking. Once cooked, use a slotted spoon to carefully remove the ravioli from the water, allowing excess water to drain. Serve immediately with your favorite sauce.
Conclusion:
And there you have it! Crafting your own delicious Butternut Squash Ravioli is a rewarding culinary adventure. We hope you’ve enjoyed this journey, transforming simple ingredients into a dish that’s both elegant and incredibly comforting. This recipe is perfect for a cozy weeknight dinner, a special occasion, or for impressing guests with your homemade pasta skills. Remember, the key to perfect ravioli lies in fresh, quality ingredients and a little patience. Don’t be afraid to get your hands a little floury – it’s all part of the fun!
For serving, we suggest a light sage brown butter sauce that complements the sweetness of the squash beautifully. A sprinkle of toasted walnuts or pecans adds a delightful crunch, and a grating of fresh Parmesan cheese ties it all together. If you’re feeling adventurous with variations, consider adding a pinch of nutmeg or cinnamon to the filling for a warmer spice profile. You could also experiment with different pasta doughs, like adding a touch of turmeric for a vibrant color.
We encourage you to try making this Butternut Squash Ravioli for yourself. It’s a dish that tastes even better when made with love. Enjoy every bite!
Frequently Asked Questions:
Can I make the ravioli dough ahead of time?
Yes, absolutely! You can prepare the ravioli dough up to 24 hours in advance. Wrap it tightly in plastic wrap and refrigerate it. When you’re ready to use it, let it sit at room temperature for about 15-20 minutes to become more pliable before rolling.
What if I don’t have a pasta maker?
No problem! You can still achieve thin, workable pasta dough by hand. Use a rolling pin and a lot of patience. Roll the dough out as thinly as you can, ensuring it’s even. It might take a little more effort, but the result will be just as delicious.
How should I store leftover Butternut Squash Ravioli?
If you have any leftover cooked ravioli, store them in an airtight container in the refrigerator for up to 2-3 days. Reheat them gently in a pan with a little butter or sauce to prevent them from becoming mushy.
Butternut Squash Ravioli – Easy & Delicious Homemade Pasta
A simple and delicious recipe for homemade butternut squash ravioli, featuring a rich and creamy filling encased in fresh pasta.
Ingredients
-
2-1/2 to 3 cups all-purpose flour, plus more for dusting
-
3 large eggs
-
1/4 cup water
-
1-1/2 teaspoons olive oil
-
2 pounds cubed peeled butternut squash
-
1 shallot, halved
-
1/3 cup olive oil (for squash)
-
2 teaspoons minced fresh sage
-
3/4 teaspoon minced fresh thyme
-
1/4 teaspoon salt (for filling)
-
1/4 teaspoon pepper (for filling)
-
1/3 cup heavy whipping cream
-
1/3 cup whole-milk ricotta cheese
Instructions
-
Step 1
Roast the butternut squash and shallot: Preheat oven to 400°F (200°C). Toss cubed butternut squash and halved shallot with 1/3 cup olive oil on a baking sheet. Roast for 30-40 minutes until fork-tender and caramelized. Let cool slightly. -
Step 2
Puree the filling: Transfer roasted squash and shallot to a food processor. Add sage, thyme, 1/4 tsp salt, and 1/4 tsp pepper. Process until smooth. In a separate bowl, combine heavy whipping cream and ricotta cheese. Add to food processor and pulse until just combined. Chill filling. -
Step 3
Make the pasta dough: In a large bowl, whisk eggs and water. Create a well in the flour, add egg mixture and 1-1/2 tsp olive oil. Gradually incorporate flour with a fork, then by hand until a shaggy ball forms. -
Step 4
Knead and rest the dough: Turn dough onto a floured surface and knead for 8-10 minutes until smooth and elastic. Wrap tightly in plastic wrap and rest at room temperature for at least 30 minutes. -
Step 5
Assemble the ravioli: Divide dough into portions. Roll out thin sheets (about 1/16-inch thick) using a rolling pin or pasta machine. Place spoonfuls of chilled filling onto one pasta sheet, about 1.5-2 inches apart. Brush around filling with water. -
Step 6
Seal and cut ravioli: Place a second pasta sheet over the top, aligning edges. Press down around filling to remove air pockets and seal. Cut into individual ravioli using a cutter or knife. Crimp edges with a fork for extra security. Place on a floured baking sheet. -
Step 7
Cook the ravioli: Bring a large pot of salted water to a rolling boil. Carefully add ravioli in batches and cook for 3-5 minutes, or until they float and pasta is tender. Remove with a slotted spoon and serve immediately with your favorite sauce.
Important Information
Nutrition Facts (Per Serving)
It is important to consider this information as approximate and not to use it as definitive health advice.
Allergy Information
Please check ingredients for potential allergens and consult a health professional if in doubt.